絶対に挫折しないiPhoneアプリ開発入門Part.12 ~Table View Controller その7、セクションを使いこなすその1、セルの矢印を表示~
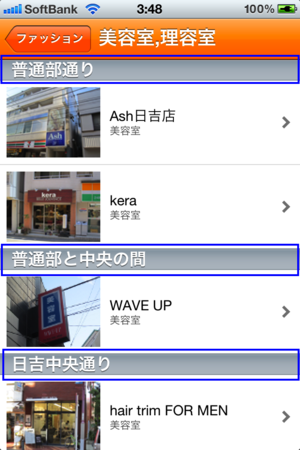
セクションを使いこなしてみましょう。
こんなやつを作ります。
(これは「ひよしまる」ではファッションジャンルの美容室理容室項目なのですが、
ここでは解説の便宜上、日吉キャンパスからの画面遷移にしたいと思います。)
新規ファイルを作成します。
同じみのUITableViewControllerですね!
ファイル名を
BiyoushitsuViewController
とします(僕の場合)
まずは、メインと詳細の配列を用意しましょう。
BiyoushitsuViewController.h
#import <UIKit/UIKit.h>

@interface BiyoushitsuViewController : UITableViewController{
    NSArray *dataSource70_0_;
    NSArray *dataSource70_1_;
    NSArray *dataSource70_2_;
    NSArray *dataSource70_3_;
    NSArray *dataSource70_4_;
    NSArray *dataSource70_5_;
    NSArray *dataSource70_6_;
    NSArray *dataSource70_7_;

    NSArray *data70_0_;
    NSArray *data70_1_;
    NSArray *data70_2_;
    NSArray *data70_3_;
    NSArray *data70_4_;
    NSArray *data70_5_;
    NSArray *data70_6_;
    NSArray *data70_7_;

}

@end
そして、mファイル。
BiyoushitsuViewController.m
- (void)viewDidLoad
{
    [super viewDidLoad];
    self.tableView.rowHeight = 90.0;
    self.navigationItem.title = @"美容室,理容室";
    dataSource70_0_ = [[NSArray alloc] initWithObjects:@"Ash日吉店",@"kera",nil];

    dataSource70_1_ = [[NSArray alloc] initWithObjects:@"WAVE UP",nil];

    dataSource70_2_ = [[NSArray alloc] initWithObjects:@"hair trim FOR MEN",@"hair design plerna",@"Merry Land",@"La pace",nil];

    dataSource70_3_ = [[NSArray alloc] initWithObjects:@"ACT",@"YUMEYUI",@"HAIR&MAKE EARTH",@"理容室シルエット",@"Neo live JuQ",@"BEENS",nil];


    dataSource70_4_ = [[NSArray alloc] initWithObjects:@"バロンDUO",@"ACT J",@"CHIC",@"Bo TaN HAIR",nil];

    dataSource70_5_ = [[NSArray alloc] initWithObjects:@"トキオインターナショナル",@"渡辺理髪店",nil];

    dataSource70_6_ = [[NSArray alloc] initWithObjects:@"バロン日吉店",nil];

    dataSource70_7_ = [[NSArray alloc] initWithObjects:@"Loops",nil];


    data70_0_ = [[NSArray alloc] initWithObjects:@"美容室",@"美容室",nil];

    data70_1_ = [[NSArray alloc] initWithObjects:@"美容室",nil];

    data70_2_ = [[NSArray alloc] initWithObjects:@"美容室",@"美容室",@"美容室",@"美容室",nil];

    data70_3_ = [[NSArray alloc] initWithObjects:@"美容室",@"美容室",@"美容室",@"理容室",@"美容室",@"美容室",nil];


    data70_4_ = [[NSArray alloc] initWithObjects:@"理容室",@"美容室",@"美容室",@"美容室",nil];

    data70_5_ = [[NSArray alloc] initWithObjects:@"美容室",@"理容室",nil];

    data70_6_ = [[NSArray alloc] initWithObjects:@"理容室",nil];

    data70_7_ = [[NSArray alloc] initWithObjects:@"美容室",nil];

    // Uncomment the following line to preserve selection between presentations.
    // self.clearsSelectionOnViewWillAppear = NO;

    // Uncomment the following line to display an Edit button in the navigation bar for this view controller.
    // self.navigationItem.rightBarButtonItem = self.editButtonItem;
}
これがviewDidLoadの中身です。
詳細では、美容室か理容室なのかが書かれています。
そしてこれは僕の環境から直接コピペしたので配列変数名が変な感じかもしれませんが、
実際こんなんなのでそのまま書いてみました^^;
続き。
//セクションの数。
- (NSInteger)numberOfSectionsInTableView:(UITableView *)tableView
{
    // Return the number of sections.
    return 8;
}
//セクションによってお店の数が違うので、配列変数の中身の個数からセルの数を読み取るということですね。
- (NSInteger)tableView:(UITableView *)tableView numberOfRowsInSection:(NSInteger)section
{
    if (section == 0) {
        return dataSource70_0_.count;
    }
    if (section == 1) {
        return  dataSource70_1_.count;
    }
    if (section == 2) {
        return dataSource70_2_.count;
    }
    if (section == 3) {
        return  dataSource70_3_.count;
    }
    if (section == 4) {
        return dataSource70_4_.count;
    }
    if (section == 5) {
        return dataSource70_5_.count;
    }
    if (section == 6) {
        return dataSource70_6_.count;
    }
    else {
        return dataSource70_7_.count;
    }
}

//セクションの題名。そしてこのセクションの題名の数が8つなので、上は return 8; になってる。--------------------------
- (NSString *)tableView:(UITableView *)tableView titleForHeaderInSection:(NSInteger)section{
    if (section == 0) {
        return @"普通部通り";
    }
    if (section == 1) {
        return @"普通部と中央の間";
    }
    if (section == 2) {
        return @"日吉中央通り";
    }
    if (section == 3) {
        return @"中央と浜銀の間";
    }
    if (section == 4) {
        return @"浜銀通り";
    }
    if (section == 5) {
        return @"浜銀とサンロードの間";
    }
    if (section == 6) {
        return @"サンロード";
    }
    else {
        return @"ムーンロードと普通部の間";
    }


}
//-----------------------------------------------このあたりで唐突ですが、
セルに矢印を表示しよう
- (UITableViewCellAccessoryType)tableView:(UITableView *)tableView accessoryTypeForRowWithIndexPath:(NSIndexPath *)indexPath{
    return UITableViewCellAccessoryDisclosureIndicator;
}
ぼくはこれをこの場所に配置しました。
- (NSString *)tableView:(UITableView *)tableView titleForHeaderInSection:(NSInteger)section{
    if (section == 0) {
        return @"普通部通り";
    }
    if (section == 1) {
        return @"普通部と中央の間";
    }
    if (section == 2) {
        return @"日吉中央通り";
    }
    if (section == 3) {
        return @"中央と浜銀の間";
    }
    if (section == 4) {
        return @"浜銀通り";
    }
    if (section == 5) {
        return @"浜銀とサンロードの間";
    }
    if (section == 6) {
        return @"サンロード";
    }
    else {
        return @"ムーンロードと普通部の間";
    }


}
//-----------------------------------------------

//-------矢印を表示するやつだよん---------------
- (UITableViewCellAccessoryType)tableView:(UITableView *)tableView accessoryTypeForRowWithIndexPath:(NSIndexPath *)indexPath{
    return UITableViewCellAccessoryDisclosureIndicator;
}
//------------------------------------------

- (UITableViewCell *)tableView:(UITableView *)tableView cellForRowAtIndexPath:(NSIndexPath *)indexPath
{
    static NSString *CellIdentifier = @"Cell";

    UITableViewCell *cell = [tableView dequeueReusableCellWithIdentifier:CellIdentifier];
    if (cell == nil) {
        cell = [[UITableViewCell alloc] initWithStyle:UITableViewCellStyleSubtitle reuseIdentifier:CellIdentifier];
    }

    // Configure the cell...
簡単に表示させることができましたね^^
UITableViewCellAccessoryType は4種類あります。
UITableViewCellAccessoryNone
UITableViewCellAccessoryDisclosureIndicator
UITableViewCellAccessoryDetailDisclosureButton
UITableViewCellAccessoryCheckmark
自分が気に入ったもの実装してくださいな^^
'autorelease' is unavailable: not available in automatic reference counting modeについて(2012年1月26日追記)
ぼくがひよしまるをつくったのはxcode4.1でした。
xcode4.2のiOS5からはARC(Automatic Reference Counting)の設定を 有効にしていると、ソース内にreleaseを含める必要が無いようです。
autoreleaseをのけ修正しました。この部分です。
if (cell == nil) {
cell = [[UITableViewCell alloc] initWithStyle:UITableViewCellStyleSubtitle reuseIdentifier:CellIdentifier];
}
次回:絶対に挫折しないiPhoneアプリ開発入門Part.13 ~Table View Controller その8、セクションを使いこなすその2、画面遷移~
======================
当ブログ管理人のツイッターはこちら
◎フォローしてくださると泣いて喜びます!ツイッター上で当ブログの質問などにもできるだけお答えしますし、役に立つiPhoneアプリ開発情報もつぶやきます。個人的なご依頼(たとえば、プログラミングの家庭教師、Skypeレッスンをしてくれないか、iPhoneアプリ開発の勉強会ってやってるの、とかですね)でもかまいません。
■スカイプレッスンについて
開発をしているとその都度ぶつかる問題があると思いますが、検索で調べてもなかなかわからない、あるいは調べても非常に時間がかかる場合があると思います。開発者のみなさんもお忙しいと思いますので、私のレッスンを受けながら開発を進めていただけると、大幅にお時間を短縮できます。加えて、iPhoneアプリ開発の基礎、応用が身につき、今後の開発もスムーズに進められます。
お問い合わせはツイッター、またはhiyoshimarukoアットマークgmail.comまでお願いします。(アットマークを@にしてください)お待ちしております!
【絶対に挫折しないiPhoneアプリ開発入門】
番外編 絶対に挫折しないiPhoneアプリ開発入門 番外編1 プログラミング初心者が初めてアプリ開発に挑戦する時
1.絶対に挫折しないiPhoneアプリ開発入門Part.1 ~Xcode4.2でひよしまるを作ろう~
2.絶対に挫折しないiPhoneアプリ開発入門Part.2 ~iOS Developer Programに参加しよう~
3.絶対に挫折しないiPhoneアプリ開発入門Part.3 ~Xcode4.2の起動、InterfaceBuilderの利点欠点、神本紹介~
4.絶対に挫折しないiPhoneアプリ開発入門Part.4 ~Single ViewControllerからスタート~
5.絶対に挫折しないiPhoneアプリ開発入門Part.5 ~画面遷移、Tab Bar Controller,Navigation Controller,Table View Controller~
6.絶対に挫折しないiPhoneアプリ開発入門Part.6 ~UITableViewController その1、Tabの名前変更~
7.絶対に挫折しないiPhoneアプリ開発入門Part.7~Table View Controller その2(ファイルの接続)、Objective C、コメントについて~
8.絶対に挫折しないiPhoneアプリ開発入門Part.8 ~Table View Controller その3、ナビゲーションバーにタイトルと色をつける~
9.絶対に挫折しないiPhoneアプリ開発入門Part.9 ~Table View Controller その4、numberOfSectionsInTableView、numberOfRowsInSection、Xcodeの背景を黒に~
10.絶対に挫折しないiPhoneアプリ開発入門Part.10 ~Table View Controller その5、cellForRowAtIndexPath~
11.絶対に挫折しないiPhoneアプリ開発入門Part.11 ~Table View Controller その6、画面遷移、didSelectRowAtIndexPath、タブバーを消す、アニメーション~
12.絶対に挫折しないiPhoneアプリ開発入門Part.12 ~Table View Controller その7、セクションを使いこなすその1、セルの矢印を表示~
13.絶対に挫折しないiPhoneアプリ開発入門Part.13 ~Table View Controller その8、セクションを使いこなすその2、画面遷移~
14.絶対に挫折しないiPhoneアプリ開発入門Part.14 ~UIWebView、webページを表示する~
15.絶対に挫折しないiPhoneアプリ開発入門Part.15 ~UITextView、電話とリンクをText Viewで表示~
16.絶対に挫折しないiPhoneアプリ開発入門Part.16 ~Table View Controller その9、テーブルを画面遷移させない、App Store申請Reject~

